本地快速部署Outline
Outline是一款类似于Notion的笔记本/团队协作Wiki软件。因为Outline在一开始就面向的团队协作,所以这款应用部署异常的难,中文的就更少了。我自己捣鼓了几天,基本把这玩意搞清楚了,快速记录下折腾过程。
阅读这篇文章之前,先假设你懂域名,会折腾服务器,会一些基础的服务器运维。这批文章将不会重点讲Web服务器部署之类的事情。
另外,Web前端的反向代理是用的Caddy,NGINX用户自行转换配置文件。
环境准备
你要先准备以下东西:
- 一个域名,配置一个主域和一个二级域。比如note.naizhao.com(用户访问Outline)和storage.naizhao.com(用于Outline存储附件),然后IP地址指向你的服务器
- Docker运行环境
- 一个微软账号,可以登陆到https://portal.azure.com/。本文将以Azure AD登陆为基础
- 一个MailJet或者MailGun或者其他的SMTP账号,用于Outline发送邮件
- 网站根目录在/var/www/com/naizhao/note
以上准备完毕,开整
设置Azure Active Directory
打开 http://portal.azure.com/ ,点击管理 Azure Active Directory,左侧导航选择应用注册,点击新注册,输入应用名称,比如Naizhao's Note,选择仅此组织目录中的帐户,重定向URL选择Web,值输入https://你的网站/auth/azure.callback,比如https://note.naizhao.com/auth/azure.callback。
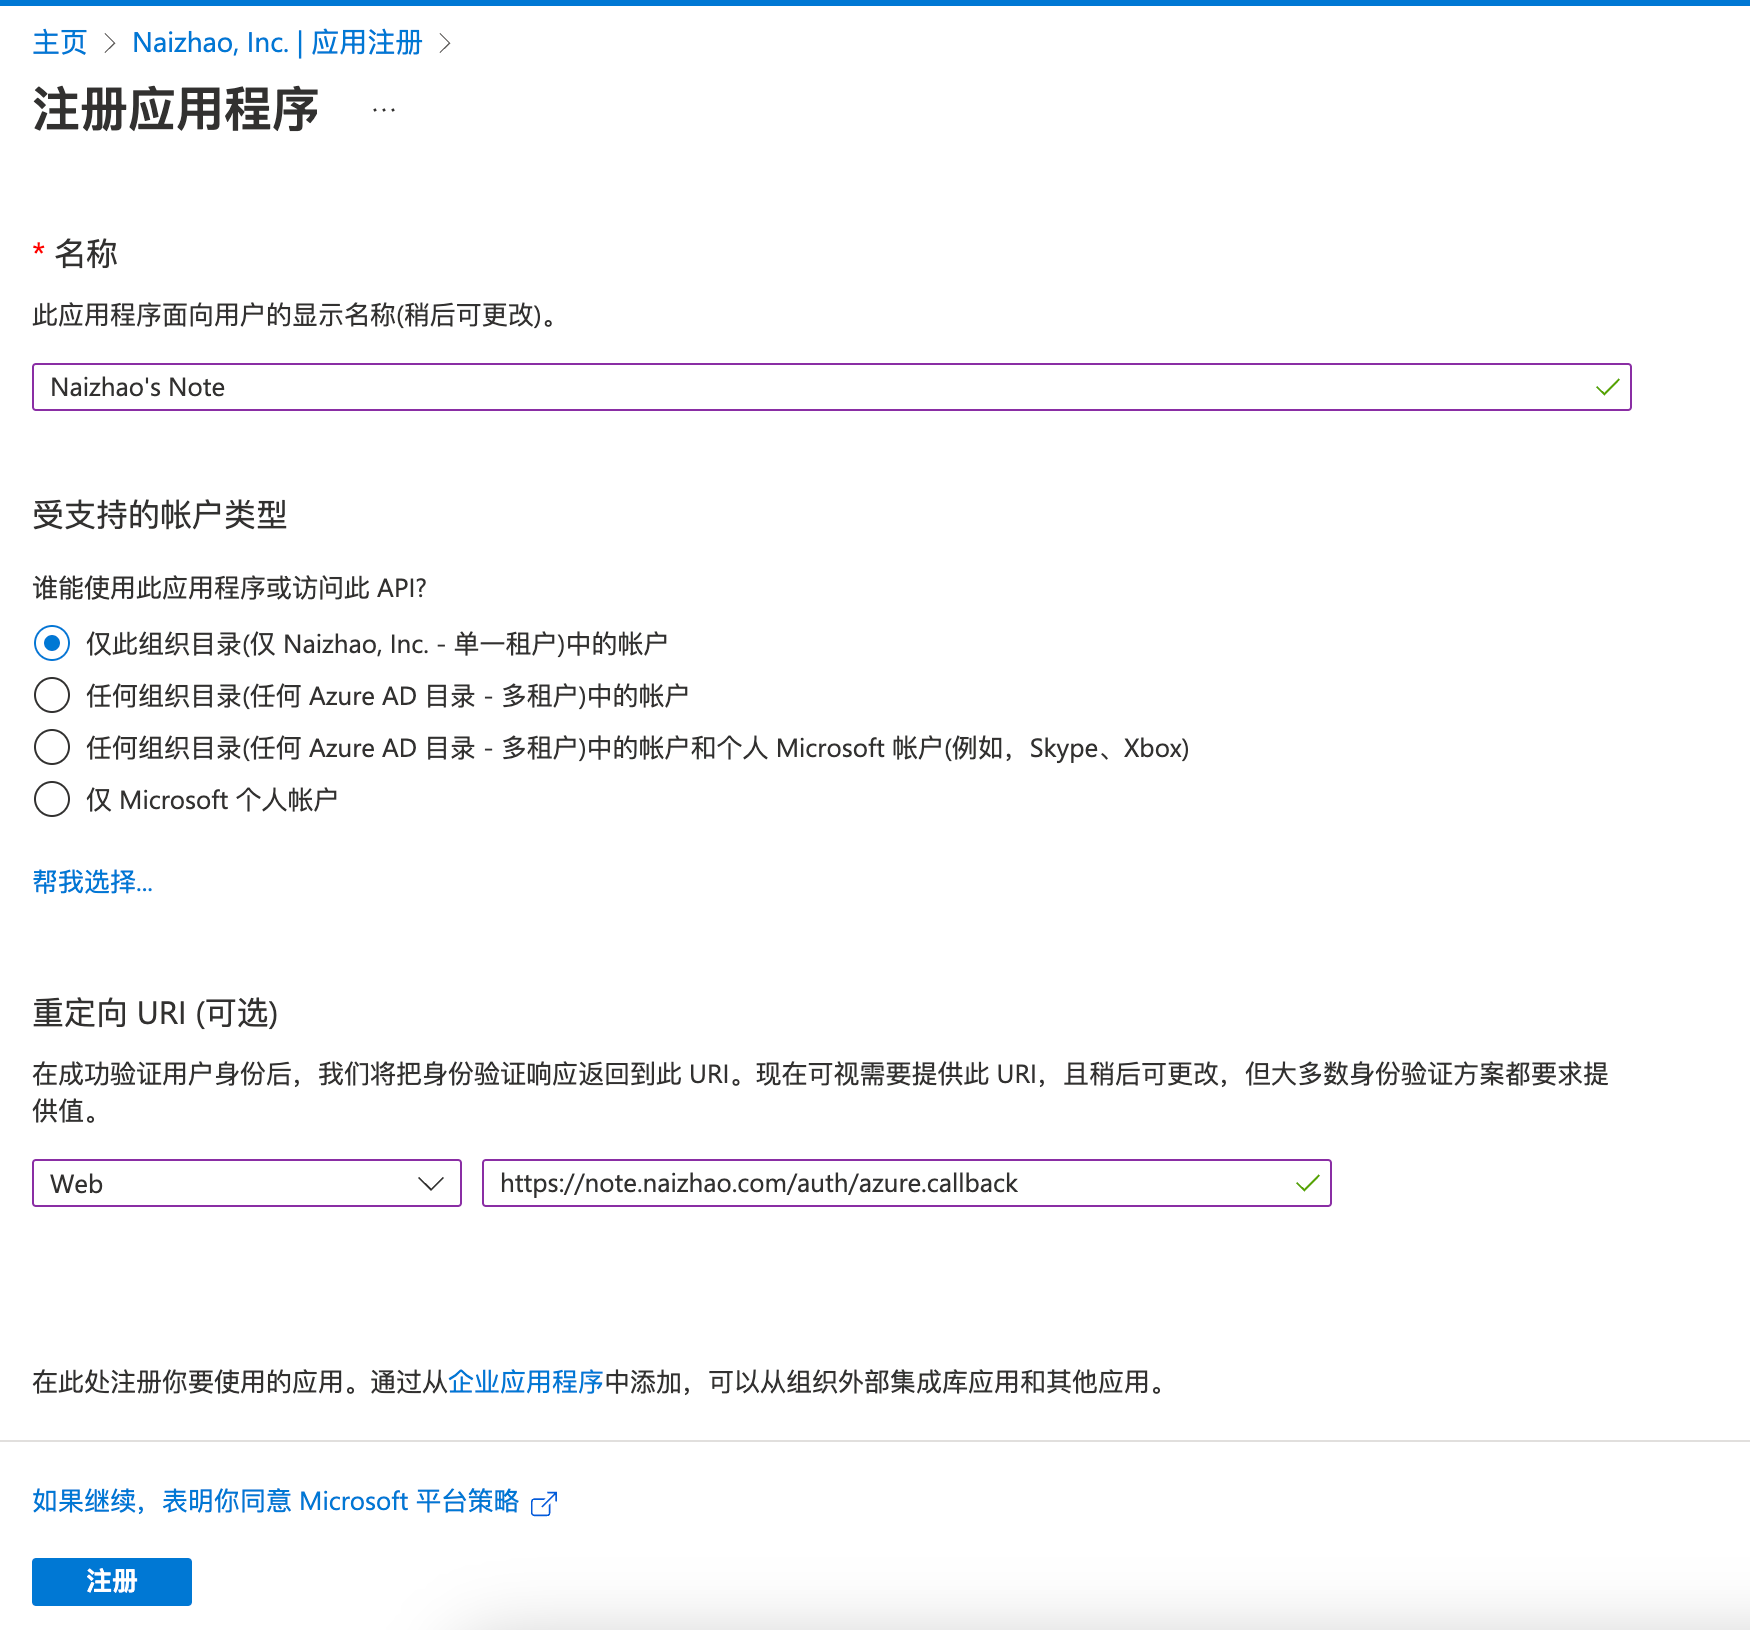
点击注册,进入下一步
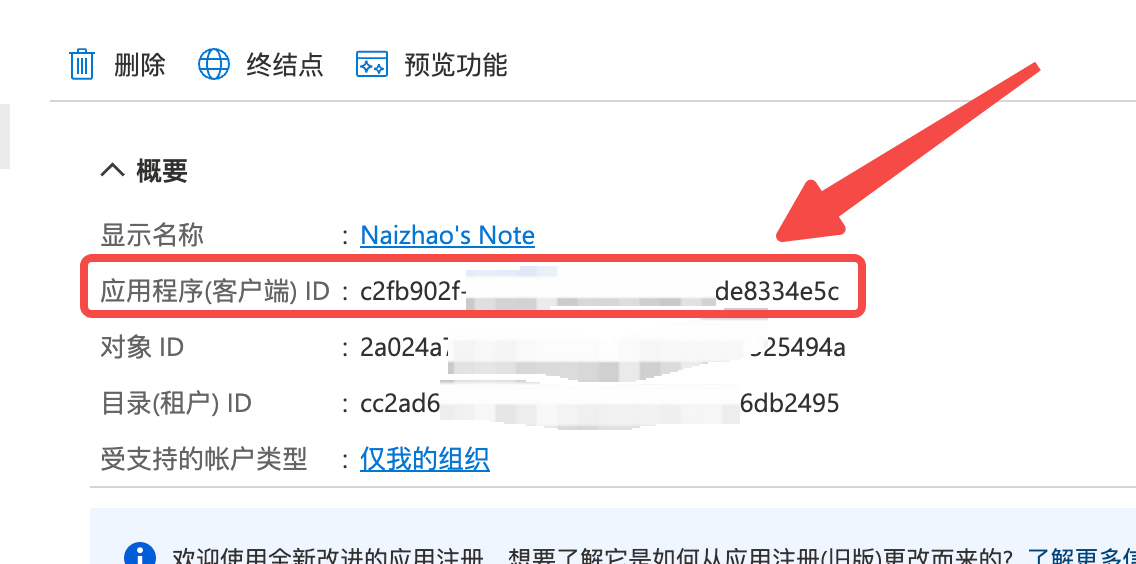
拷贝应用程序(客户端) ID,备用
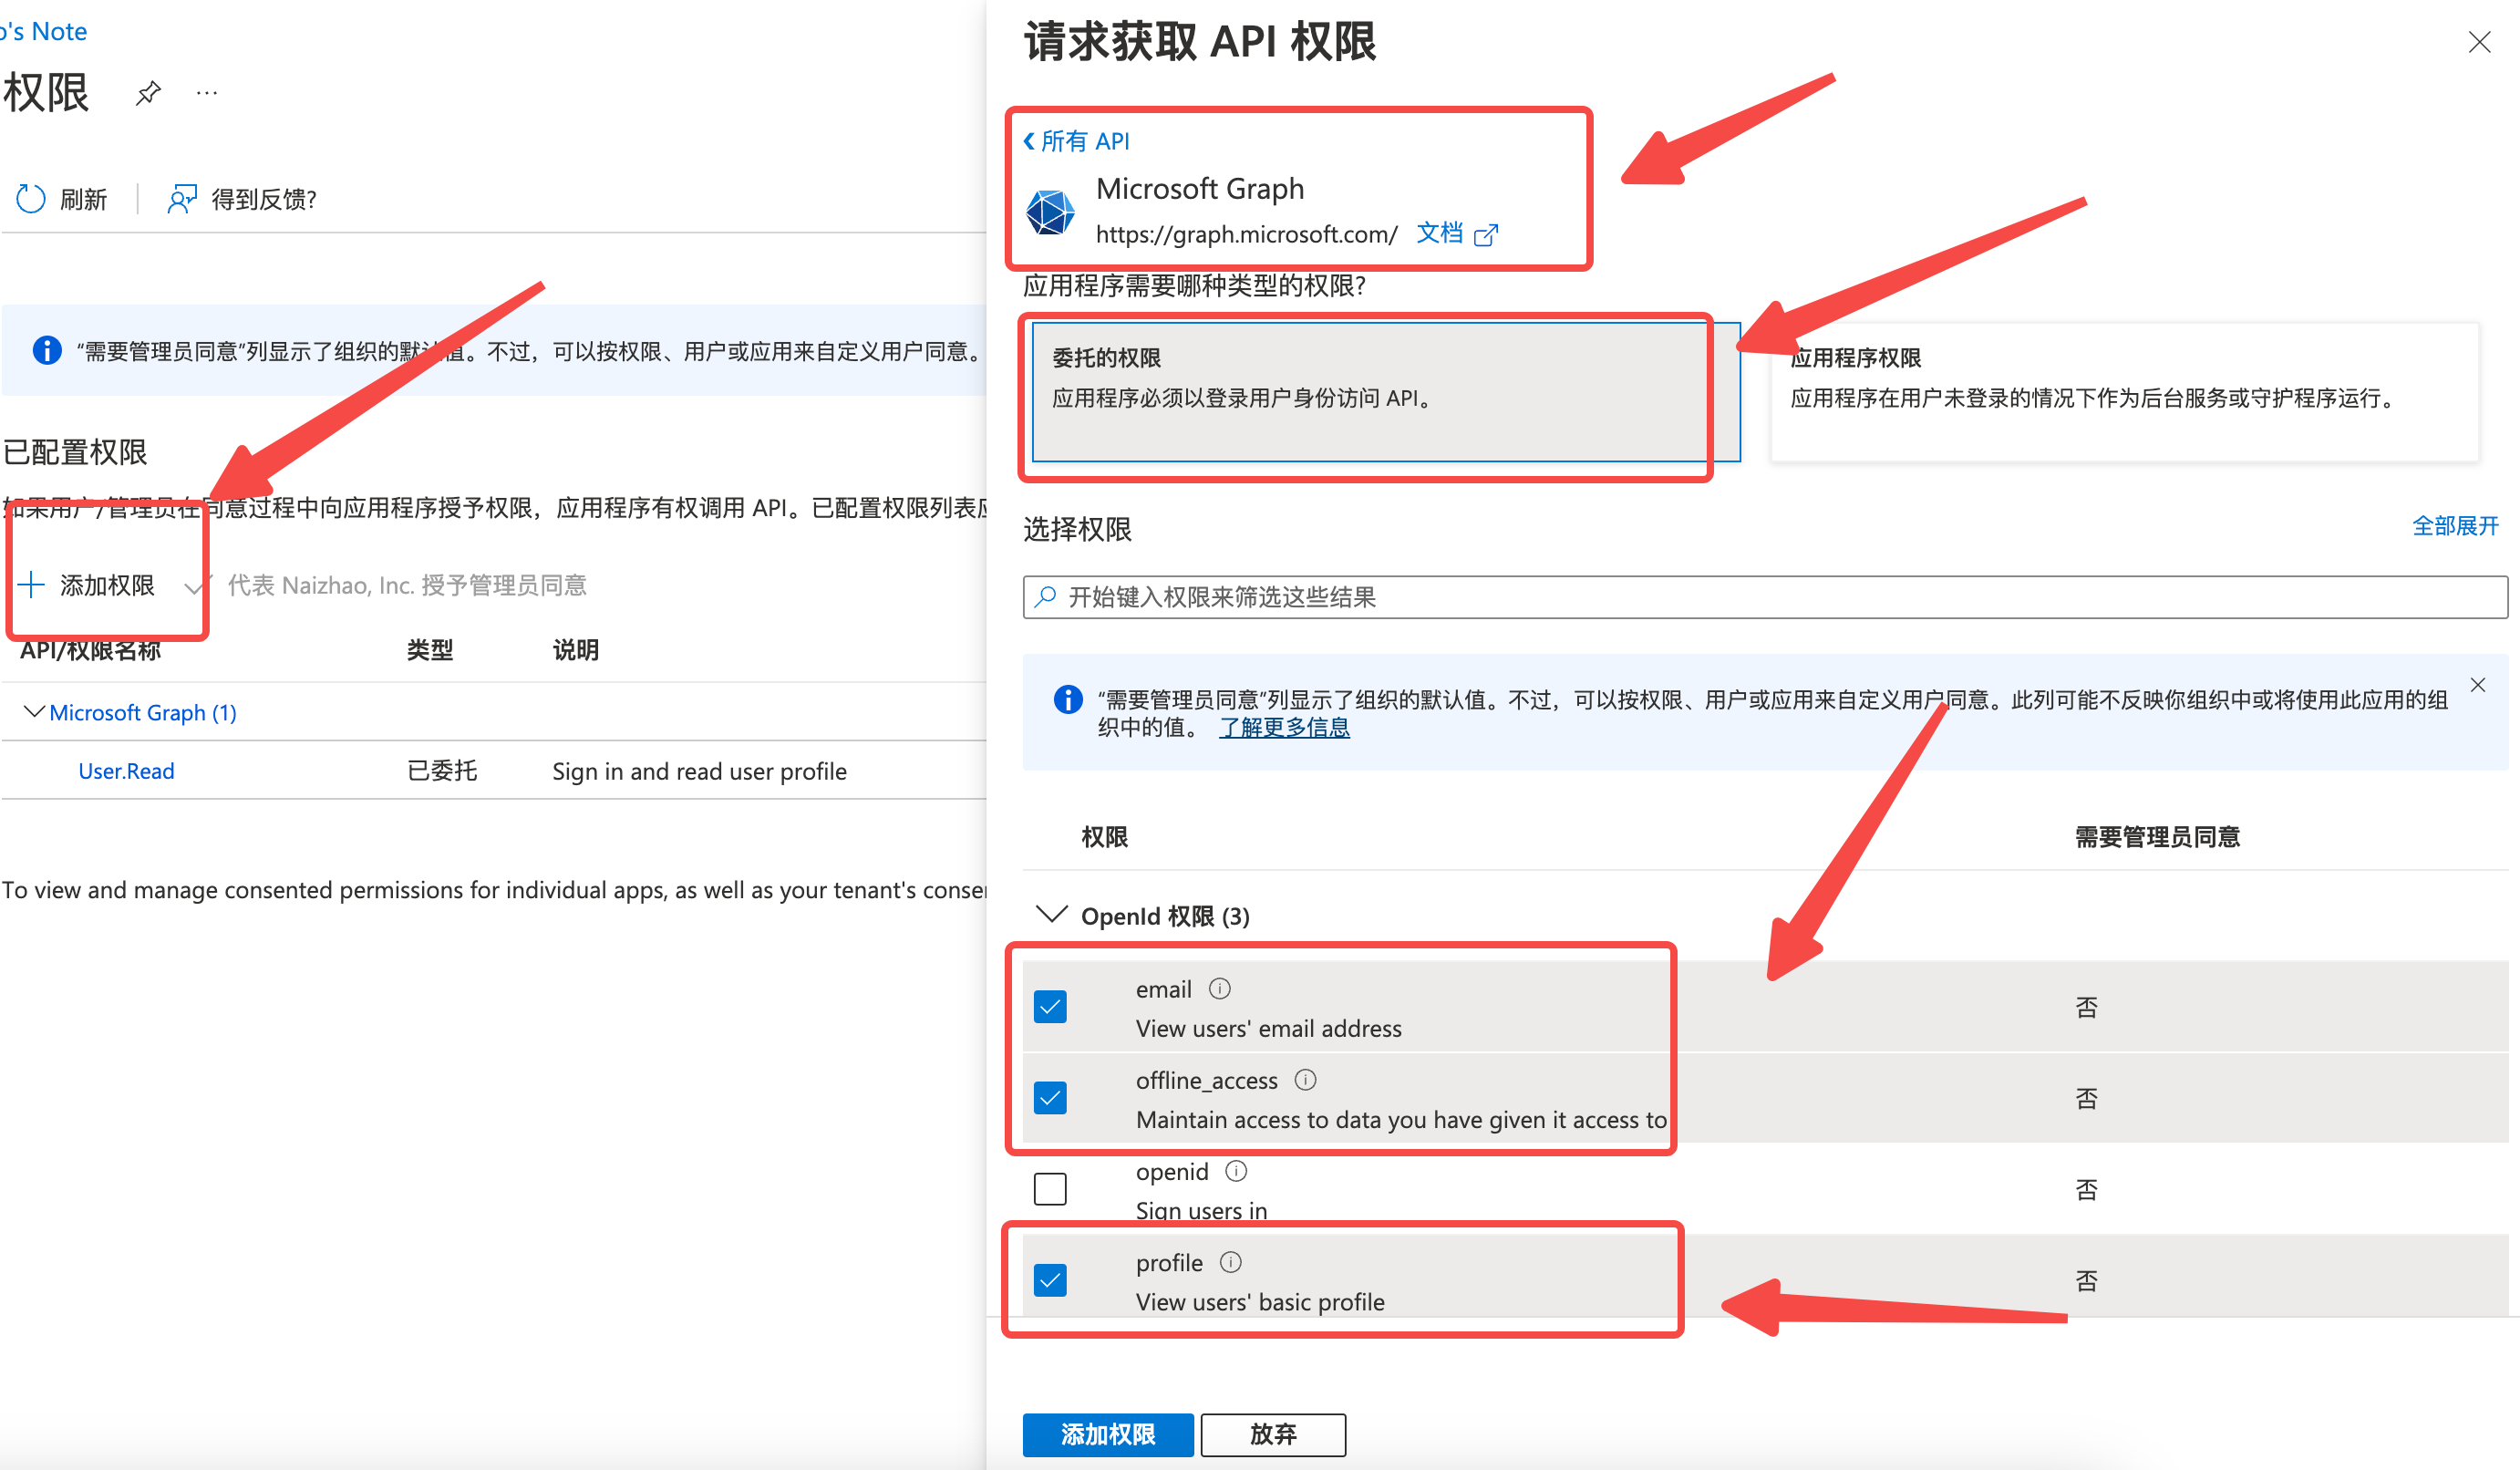
左侧点击API 权限,右侧点击添加权限,选择Microsoft Graph,选择委托的权限,在下面的OpenID权限中,把email、offline_access、profile三个选上,点击添加权限。如下图
左侧导航点击证书和密码,点击新客户端密码,说明里面可以填一个容易识别的名字,比如Outline,截止期限默认或者选择其他值,点击添加
接下来你需要把出现的密码保存,这个密码只出现一次!

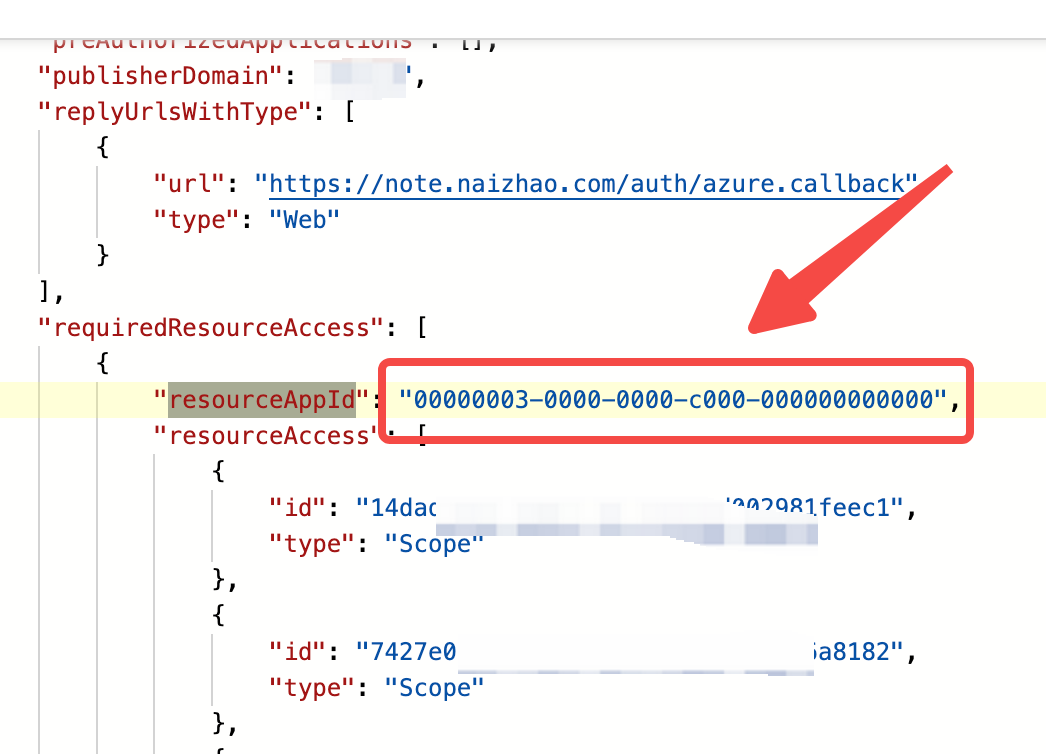
点击左侧导航的清单,右侧代码中搜索resourceAppId,拷贝下来备用
OK,截止到现在,你拷贝了三个值,分别是
AZURE_CLIENT_ID=应用程序ID(第一个拷贝的)
AZURE_CLIENT_SECRET=客户端密码(第二个拷贝的)
AZURE_RESOURCE_APP_ID=APPID(第三个拷贝的)
这里的三个值,一会在docker.env里面要用到
docker.env
在网站根目录/var/www/com/naizhao/note,创建docker.env文件,内容如下(把<>里面的值按实际情况替换掉)
# –––––––––––––––– REQUIRED ––––––––––––––––

NODE_ENV=production

# Generate a hex-encoded 32-byte random key. You should use `openssl rand -hex 32`
# in your terminal to generate a random value.
SECRET_KEY=<bash下运行"openssl rand -hex 32"生成>

# Generate a unique random key. The format is not important but you could still use
# `openssl rand -hex 32` in your terminal to produce this.
UTILS_SECRET=<bash下运行"openssl rand -hex 32"生成>

# For production point these at your databases, in development the default
# should work out of the box.
DATABASE_URL=postgres://<数据库用户名>:<数据库密码>@postgres:5432/outline
DATABASE_URL_TEST=postgres://<数据库用户名>:<数据库密码>@postgres:5432/outline-test
DATABASE_CONNECTION_POOL_MIN=
DATABASE_CONNECTION_POOL_MAX=
# Uncomment this to disable SSL for connecting to Postgres
PGSSLMODE=disable

# For redis you can either specify an ioredis compatible url like this
REDIS_URL=redis://redis:6379
# or alternatively, if you would like to provide additional connection options,
# use a base64 encoded JSON connection option object. Refer to the ioredis documentation
# for a list of available options.
# Example: Use Redis Sentinel for high availability
# {"sentinels":[{"host":"sentinel-0","port":26379},{"host":"sentinel-1","port":26379}],"name":"mymaster"}
# REDIS_URL=ioredis://eyJzZW50aW5lbHMiOlt7Imhvc3QiOiJzZW50aW5lbC0wIiwicG9ydCI6MjYzNzl9LHsiaG9zdCI6InNlbnRpbmVsLTEiLCJwb3J0IjoyNjM3OX1dLCJuYW1lIjoibXltYXN0ZXIifQ==

# URL should point to the fully qualified, publicly accessible URL. If using a
# proxy the port in URL and PORT may be different.
URL=https://<网站地址>
PORT=3000

# See [documentation](docs/SERVICES.md) on running a separate collaboration
# server, for normal operation this does not need to be set.
COLLABORATION_URL=

# To support uploading of images for avatars and document attachments an
# s3-compatible storage must be provided. AWS S3 is recommended for redundancy
# however if you want to keep all file storage local an alternative such as
# minio (https://github.com/minio/minio) can be used.

# A more detailed guide on setting up S3 is available here:
# => https://wiki.generaloutline.com/share/125de1cc-9ff6-424b-8415-0d58c809a40f
#
AWS_ACCESS_KEY_ID=<minio用户名>
AWS_SECRET_ACCESS_KEY=<minio密码>
AWS_REGION=local
# AWS_S3_ACCELERATE_URL=
AWS_S3_UPLOAD_BUCKET_URL=https://<附件存储域名,比如storage.naizhao.com>
AWS_S3_UPLOAD_BUCKET_NAME=outline-bucket
AWS_S3_UPLOAD_MAX_SIZE=26214400
# AWS_S3_FORCE_PATH_STYLE=true
AWS_S3_ACL=public-read


# –––––––––––––– AUTHENTICATION ––––––––––––––

# Third party signin credentials, at least ONE OF EITHER Google, Slack,
# or Microsoft is required for a working installation or you'll have no sign-in
# options.

# To configure Slack auth, you'll need to create an Application at
# => https://api.slack.com/apps
#
# When configuring the Client ID, add a redirect URL under "OAuth & Permissions":
# https://<URL>/auth/slack.callback
SLACK_CLIENT_ID=
SLACK_CLIENT_SECRET=

# To configure Google auth, you'll need to create an OAuth Client ID at
# => https://console.cloud.google.com/apis/credentials
#
# When configuring the Client ID, add an Authorized redirect URI:
# https://<URL>/auth/google.callback
GOOGLE_CLIENT_ID=
GOOGLE_CLIENT_SECRET=

# To configure Microsoft/Azure auth, you'll need to create an OAuth Client. See
# the guide for details on setting up your Azure App:
# => https://wiki.generaloutline.com/share/dfa77e56-d4d2-4b51-8ff8-84ea6608faa4
AZURE_CLIENT_ID=<应用程序ID(第一个拷贝的)>
AZURE_CLIENT_SECRET=<客户端密码(第二个拷贝的)>
AZURE_RESOURCE_APP_ID=<APPID(第三个拷贝的)>

# To configure generic OIDC auth, you'll need some kind of identity provider.
# See documentation for whichever IdP you use to acquire the following info:
# Redirect URI is https://<URL>/auth/oidc.callback
OIDC_CLIENT_ID=
OIDC_CLIENT_SECRET=
OIDC_AUTH_URI=
OIDC_TOKEN_URI=
OIDC_USERINFO_URI=

# Specify which claims to derive user information from
# Supports any valid JSON path with the JWT payload
OIDC_USERNAME_CLAIM=preferred_username

# Display name for OIDC authentication
OIDC_DISPLAY_NAME=OpenID

# Space separated auth scopes.
OIDC_SCOPES=openid profile email


# –––––––––––––––– OPTIONAL ––––––––––––––––

# Base64 encoded private key and certificate for HTTPS termination. This is only
# required if you do not use an external reverse proxy. See documentation:
# https://wiki.generaloutline.com/share/1c922644-40d8-41fe-98f9-df2b67239d45
SSL_KEY=
SSL_CERT=

# If using a Cloudfront/Cloudflare distribution or similar it can be set below.
# This will cause paths to javascript, stylesheets, and images to be updated to
# the hostname defined in CDN_URL. In your CDN configuration the origin server
# should be set to the same as URL.
CDN_URL=

# Auto-redirect to https in production. The default is true but you may set to
# false if you can be sure that SSL is terminated at an external loadbalancer.
FORCE_HTTPS=false

# Have the installation check for updates by sending anonymized statistics to
# the maintainers
ENABLE_UPDATES=true

# How many processes should be spawned. As a reasonable rule divide your servers
# available memory by 512 for a rough estimate
WEB_CONCURRENCY=1

# Override the maximum size of document imports, could be required if you have
# especially large Word documents with embedded imagery
MAXIMUM_IMPORT_SIZE=5120000

# You can remove this line if your reverse proxy already logs incoming http
# requests and this ends up being duplicative
# DEBUG=http

# For a complete Slack integration with search and posting to channels the
# following configs are also needed, some more details
# => https://wiki.generaloutline.com/share/be25efd1-b3ef-4450-b8e5-c4a4fc11e02a
#
SLACK_VERIFICATION_TOKEN=
SLACK_APP_ID=
SLACK_MESSAGE_ACTIONS=

# Optionally enable google analytics to track pageviews in the knowledge base
GOOGLE_ANALYTICS_ID=

# Optionally enable Sentry (sentry.io) to track errors and performance,
# and optionally add a Sentry proxy tunnel for bypassing ad blockers in the UI:
# https://docs.sentry.io/platforms/javascript/troubleshooting/#using-the-tunnel-option)
SENTRY_DSN=
SENTRY_TUNNEL=

# To support sending outgoing transactional emails such as "document updated" or
# "you've been invited" you'll need to provide authentication for an SMTP server
SMTP_HOST=<SMTP服务器>
SMTP_PORT=<SMTP端口,比如465>
SMTP_USERNAME=<SMTP用户名>
SMTP_PASSWORD=<SMTP密码>
SMTP_FROM_EMAIL=<发件人地址>
SMTP_REPLY_EMAIL=<邮件回复地址>
SMTP_TLS_CIPHERS=TLSv1.2
SMTP_SECURE=true

# The default interface language. See translate.getoutline.com for a list of
# available language codes and their rough percentage translated.
DEFAULT_LANGUAGE=zh_CN

# Optionally enable rate limiter at application web server
RATE_LIMITER_ENABLED=true

# Configure default throttling parameters for rate limiter
RATE_LIMITER_REQUESTS=1000
RATE_LIMITER_DURATION_WINDOW=60
docker-compose.yml
在网站根目录/var/www/com/naizhao/note,创建docker-compose.yml文件,内容如下(把<>里面的值按实际情况替换掉)
version: "3"
services:

  outline:
    image: outlinewiki/outline:latest
    env_file: ./docker.env
    command: sh -c "yarn sequelize:migrate --env production-ssl-disabled && yarn start"
    ports:
      - "3000:3000"
    depends_on:
      - postgres
      - redis
      - storage

  redis:
    image: redis
    ports:
      - "6379:6379"
    volumes:
      - ./redis.conf:/redis.conf
    command: ["redis-server", "/redis.conf"]
    healthcheck:
      test: ["CMD", "redis-cli", "ping"]
      interval: 10s
      timeout: 30s
      retries: 3

  postgres:
    image: postgres
    ports:
      - "5432:5432"
    volumes:
      - ./database-data:/var/lib/postgresql/data
    healthcheck:
      test: ["CMD", "pg_isready -U user"]
      interval: 30s
      timeout: 20s
      retries: 3
    environment:
      POSTGRES_USER: '<数据库用户名>'
      POSTGRES_PASSWORD: '<数据库密码>'
      POSTGRES_DB: 'outline'

  storage:
    image: minio/minio
    env_file: ./docker.env
    ports:
      - "9001:9001"
      - "9002:9002"
    entrypoint: sh
    command: -c 'minio server /data --address ":9001" --console-address ":9002"'
    deploy:
      restart_policy:
        condition: on-failure
    volumes:
      - ./storage-data:/data
    healthcheck:
      test: ["CMD", "curl", "-f", "http://localhost:9001/minio/health/live"]
      interval: 30s
      timeout: 20s
      retries: 3
    environment:
      - MINIO_ROOT_USER=<minio用户名>
      - MINIO_ROOT_PASSWORD=<minio密码>
docker-compose-init-minio.yml
因为存储没用S3或者COS之类的对象存储,而是用了minio来本地实现。然后minio的docker开启后没有进行初始化配置,所以第一次要先进行一个初始化。还是在同一个目录里面,创建docker-compose-init-minio.yml这个文件
version: "3"
services:

  startup:
    image: minio/mc
    entrypoint: /bin/sh -c "
      /usr/bin/mc config host rm local;
      /usr/bin/mc config host add local http://storage:9001 <minio用户名> <minio密码>;
      /usr/bin/mc mb local/outline-bucket;
      /usr/bin/mc anonymous set public local/outline-bucket;
      exit 0;"
启动环境
OK,到现在基本工作已经准备完毕,如果一切都没问题,我们可以把Docker镜像跑起来了
在网站根目录,运行
# docker-compose up -d如果一切正常,你会看到拉取镜像,启动,不会有任何报错
然后,我们初始化minio(只需要第一次初始化的时候运行,后续不用再运行)
# docker-compose up -f docker-compose-init-minio.yml正常的话,也不会有任何报错,Outline、minio、redis、postgresql应该都跑起来了
Caddy做反向代理
因为Outline是跑在了Docker环境下,用了3000这个端口,所以我们需要在前面做一层反向代理,让Outline可以在80/443端口被访问到。
前面提到,Web Server我用了Caddy而不是NGINX,所以提供参考的Caddyfile文件配置如下
# 反代Outline
<Outline域名,如note.naizhao.com> {
    encode zstd gzip

    tls <你的邮箱>

    header / {
        X-Content-Type-Options nosniff
        X-Frame-Options "SAMEORIGIN"
        X-XSS-Protection "1; mode=block"
        X-Robots-Tag none
        X-Download-Options noopen
        X-Permitted-Cross-Domain-Policies none
        Strict-Transport-Security "max-age=31536000; includeSubDomains; preload"
        -Server
    }

    # 反代Outline的3000端口
    reverse_proxy 127.0.0.1:3000 {
        header_up X-Real-IP {remote_host}
    }
}

# 反代minio
<minio域名,如storage.notebook.team> {
    encode zstd gzip

    tls <你的邮箱>

    # 反代minio的9001端口
    reverse_proxy 127.0.0.1:9001 {
        header_up X-Forwarded-Proto {http.request.scheme}
        header_up X-Forwarded-Host {http.request.host}
        header_up Host {http.request.host}
        header_down Access-Control-Allow-Origin "*"
    }
}
然后,启动/重启 Caddy
总结
按照以上配置,只要不出问题,你就可以输入你的域名,访问Outline了。