使用Cloudflare Tunnel实现内网穿透,把服务器架在家里
Cloudflare Tunnel是Cloudflare零信任网络的一个产品,用于打通企业、员工、设备之间的边界,从而摒弃掉VPN之类的过时技术(其实也不是过时,只不过是相对来说安全性、可控性较差)
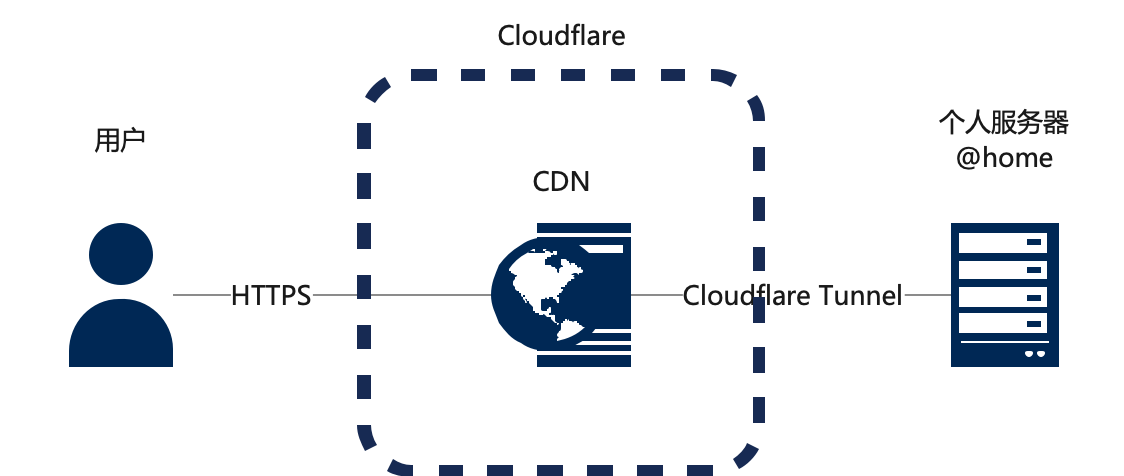
通过Cloudflare Tunnel,可以实现云与设备之间打通一条加密通道,这样Cloudflare的CDN就可以很方便的通过这条加密通道访问到部署在内网的服务,包括Web、SSH等。同时,还不用考虑电信、移动等ISP不提供固定IP地址、不能开放端口,甚至解决备案的问题。
而且,还免费。
所以,整套内网穿透的方案大致如下
前置条件
- 首先,你要有一个Cloudflare的账号,并且添加了所需要使用的域名,同时,开通Cloudflare Zero Trust。
- 本地内网有一台Linux服务器。CentOS、Ubuntu、Debian都无所谓,树莓派也没问题。Web网站正常跑,内网能正常访问。
安装Cloudflared
Cloudflared是Cloudflare Tunnel的一个本地cli客户端,可以实现管理功能和守护程序。
macOS可以用homebrew安装
brew install cloudflaredLinux直接下载编译好的二进制包安装
curl -L 'https://github.com/cloudflare/cloudflared/releases/latest/download/cloudflared-linux-amd64' -o /usr/bin/cloudflared
chmod +x /usr/bin/cloudflared
登陆Cloudflared
使用前,我们需要先登录
cloudflared tunnel login输入命令后,终端会给出一个登陆地址,我们拷贝到浏览器里面打开,选择需要授权的网站。
[root@Web-Server-1]# cloudflared tunnel login
A browser window should have opened at the following URL:

https://dash.cloudflare.com/argotunnel?callback=https%3A%2F%2Flogin.cloudflareaccess.org%JLKY87tdfsakh-jlfsakjuo8sFFJ%3D

If the browser failed to open, please visit the URL above directly in your browser.
You have successfully logged in.
If you wish to copy your credentials to a server, they have been saved to:
/root/.cloudflared/cert.pem创建隧道
授权完以后,我们需要创建隧道。一般建议一台服务器创建一个隧道。
cloudflared tunnel create <隧道名字>
# 比如
cloudflared tunnel create webserver-1
创建完以后,会输出隧道的一个UUID,记录下来
[root@Web-Server-1]# cloudflared tunnel create webserver-1
Tunnel credentials written to /root/.cloudflared/12345-123-123-123-12345.json. cloudflared chose this file based on where your origin certificate was found. Keep this file secret. To revoke these credentials, delete the tunnel.

Created tunnel webserver-1 with id 12345-123-123-123-12345
域名指向
接着,我们需要把域名指向到对应的隧道
cloudflared tunnel route dns <隧道名字> <域名>
# 比如一级域名(和Web界面不一样,不需要输入@)
cloudflared tunnel route dns webserver-1 abc.com
# 又比如二级域名
cloudflared tunnel route dns webserver-1 www.abc.com
这时候,Cloudflare会自动添加一条CNAME记录到对应的域名。
对于多个其他域名,我们需要登录Cloudflare的Web控制台,对应添加CNAME记录,记录值是
<隧道UUID>.cfargotunnel.com

比如

12345-123-123-123-12345.cfargotunnel.com
按照上面的说明和图片,我们一条条记录加好。
配置Cloudflared
接着,我们开始配置Cloudflared,先编辑一个配置文件
vim ~/.cloudflared/config.yml输入下面的内容(根据自己要求编辑)
tunnel: <隧道UUID>
credentials-file: /root/.cloudflared/<隧道UUID>.json
protocol: h2mux
ingress:
  # 第一个网站,连接到本地的80端口
  - hostname: <域名1.com>
    service: http://localhost:80
  # 第二个网站,https协议,连接到本地的443端口,禁用证书校验(用于自签名SSL证书)
  - hostname: <域名2.com>
    service: https://127.0.0.1:443
    originRequest:
      noTLSVerify: true
      originServerName: <域名2.com>
  # 第三个网站,8012端口,泛域名
  - hostname: <*.域名3.com>
    service: http://localhost:8012
  # 第四个,反代MySQL sock服务
  - hostname: <mysql.域名4.com>
    service: unix:/tmp/mysql.sock
  # 第五个,反代SSH服务
  - hostname: <ssh.域名5.com>
    service: ssh://localhost:22
- service: http_status:404更多支持的服务和配置方式,参考帮助文档:Supported protocols
配置完以后,我们测试下配置文件有没有问题
cloudflared tunnel ingress validate还可以再测试下规则是否命中
cloudflared tunnel ingress rule https://<域名1.com>
测试运行
如果没问题,OK,一切妥当,我们开始测试
cloudflared --loglevel debug --transport-loglevel warn --config ~/.cloudflared/config.yml tunnel run <隧道UUID>终端会输出一大堆log,但没有红色报错,那就没问题。
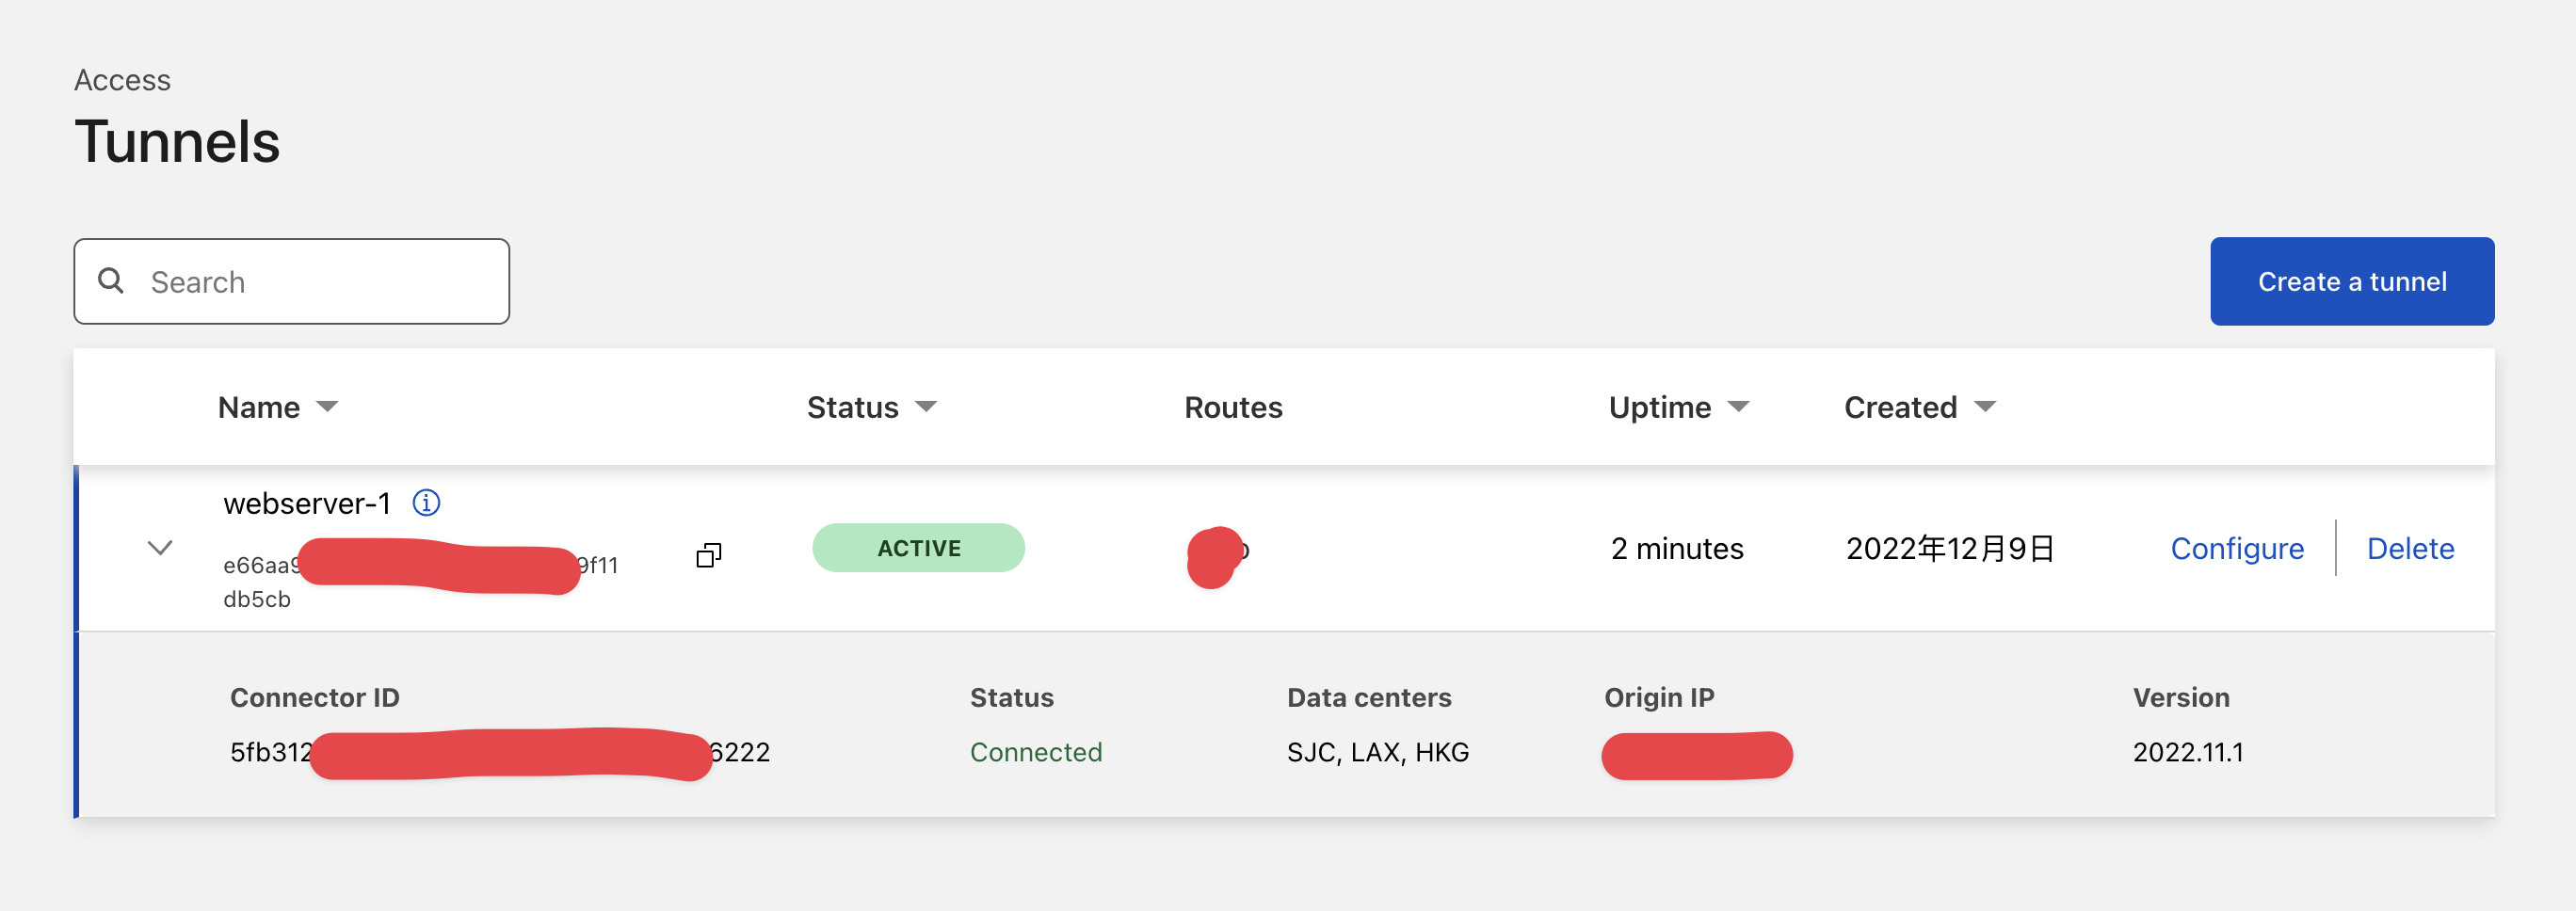
我们登陆Cloudflare Zero Trust的Web控制台,左边选择Access-Tunnels,可以看到隧道已经跑起来了,状态是Active。
然后,我们在浏览器里面输入域名,正常情况下,你可以看到网站已经可以正常访问了。done
创建系统服务
按下Ctrl+z,先停掉刚才启动的服务。为了让服务能每次系统启动的时候都跟着启动,我们需要把Cloudflared注册成系统服务。不然系统一重启,就歇菜了。
cloudflared service install
systemctl start cloudflared
systemctl status cloudflared
跑完这三条命令,应该就可以看到服务有正常输出,并且Web控制台也可以看到状态是Active。
● cloudflared.service - cloudflared
     Loaded: loaded (/etc/systemd/system/cloudflared.service; enabled; vendor preset: disabled)
     Active: active (running) since Fri 2022-12-09 17:22:43 CST; 9s ago
   Main PID: 37812 (cloudflared)
      Tasks: 18 (limit: 407348)
     Memory: 23.5M
        CPU: 71ms
     CGroup: /system.slice/cloudflared.service
             └─37812 /usr/local/bin/cloudflared --no-autoupdate --config /etc/cloudflared/config.yml tunnel run

Dec 09 17:22:42 Web-Server-1 cloudflared[37812]: 2022-12-09T09:22:42Z INF Generated Connector ID: 12345-123-123-123-12345
Dec 09 17:22:42 Web-Server-1 cloudflared[37812]: 2022-12-09T09:22:42Z INF Initial protocol h2mux
Dec 09 17:22:42 Web-Server-1 cloudflared[37812]: 2022-12-09T09:22:42Z INF ICMP proxy will use 127.0.0.1 as source for IPv4
Dec 09 17:22:42 Web-Server-1 cloudflared[37812]: 2022-12-09T09:22:42Z INF ICMP proxy will use ::: in zone eno1 as source for IPv6
Dec 09 17:22:42 Web-Server-1 cloudflared[37812]: 2022-12-09T09:22:42Z INF Starting metrics server on 127.0.0.1:12345/metrics
Dec 09 17:22:43 Web-Server-1 cloudflared[37812]: 2022-12-09T09:22:43Z INF Connection 12345-123-123-123-12345 registered connIndex=0 ip=<nil> location=SJC
Dec 09 17:22:43 Web-Server-1 systemd[1]: Started cloudflared.
Dec 09 17:22:44 Web-Server-1 cloudflared[37812]: 2022-12-09T09:22:44Z INF Connection 12345-123-123-123-12345 registered connIndex=1 ip=<nil> location=HKG
Dec 09 17:22:46 Web-Server-1 cloudflared[37812]: 2022-12-09T09:22:46Z INF Connection 12345-123-123-123-12345 registered connIndex=3 ip=<nil> location=HKG
Dec 09 17:22:46 Web-Server-1 cloudflared[37812]: 2022-12-09T09:22:46Z INF Connection 12345-123-123-123-12345 registered connIndex=2 ip=<nil> location=SJC总结
如果有多台服务器,那么可以在不同的服务器安装多个Cloudflared,配置多个Tunnel。
文章写完了,不知道花生壳的几位老板会不会怼我,哈哈